MOVING TO PORTUGAL | Part II
Applying for the Residency Permit.

About the series: Welcome back to this 3-part series where I’m sharing our personal journey about moving to Portugal. You can find Part I here and Part III here.
How are you feeling after reading Part I?

It was a lot of information, I know, but I wanted to be as transparent as possible in exactly what it took to get here.
The good news is that the visa process was, by far, the biggest hurdle we faced. Having already covered that, let’s turn our attention to the residency permit.
Today we’ll tackle:
💡NOTEWORTHY: As a friendly reminder, the information shared here — and throughout this series — is based solely on our personal experience. It’s intended as a general reference, not legal or immigration advice. This post specifically reflects US-based procedures we followed as Americans. Each country has its own visa rules and processes for Portugal, so please do your own due diligence.
Let’s go!
Residency Permit Process
Finding Our Appointment Slots
Our residency permit appointments were automatically assigned to us and took place about a month after we received our visas.
We discovered our date and time by creating an online SEF account and logging in using the visa number stamped in our passports.
The only reason we even knew to check was thanks to a few generous expat friends who had seen the tip shared in a local Facebook group.
Josh and I were given separate appointments, in two different cities, scheduled for the same day at the same time — common practice then to better distribute processing workloads across different centers.
It does seem that AIMA is still auto-scheduling appointments.
💡NOTEWORTHY: At the time we went through this, SEF (Serviço de Estrangeiros e Fronteiras) was still in operation as Portugal’s immigration bureau. It has since been replaced by AIMA (Agência para a Integração, Migrações e Asilo). This change consolidated several social service branches and, as a result, created an extensive administrative backlog in the process. You can read more about that here.
Although I’m not an immigration expert, I’ve done my best to recap our experience as accurately as possible below — while also noting a few procedural changes that have seemingly taken effect since. It’s important that you do your own research as you undergo this process.

Preparing the Application Packet
For our appointment, we were required to bring many of the same items we shared for the visa application — with some slight variation:
Permit application
Two recent photographs
Passport
Residence visa (located inside our passports)
Evidence of sufficient means of subsistence (bank accounts, pay stubs, etc.)
Proof of accommodation (lease but also an Atestado de Residência — see more below)
Supporting evidence of registration within tax authority (aka NIF)
Document proving that the applicant is registered with the Social Security (not applicable to us)
Proof of health insurance coverage (we shared our Allianz health policy)
You can find all of the AIMA requirements here (this one would be the most applicable to us now). You can use the translate function in your web browser to read the text in English.
What exactly is Atestado de Residência? 🧐
Atestado de Residência is a notarized document verifying our municipality residence. To obtain one, we went to our local parish, or Freguesia, which is similar to an alderman’s office.
We submitted receipts of our rent payments — downloaded from Autoridade Tributária e Aduaneira (Finanças) — and they issued a letter validating our place of residence (the fee was nominal, about €12); the rent receipts were already uploaded by our landlord’s accountant.
To do this, we logged into Finanças by clicking Iniciar Sessão and entering our NIF and password (creating an account online is easy once you have your NIF).
Searched “Recibos de arrendamento” ➡️ Clicked Aceder for Consultar Recibos ➡️ Locatario (middle of the screen) ➡️ Recibos on the next page ➡️ Imprimir to find the official monthly receipts
When you get the Atestado, it’s also a great idea to register your pet (if you have one) simultaneously — more below.
Attending the Appointment
Submitting Documents
Our experiences varied a lot depending on the location — and we weren’t alone. Many expat friends said the same.
At my appointment, I was asked for nearly everything on the checklist above. Josh, on the other hand, was only asked for a handful of documents: his proof of business and business bank statements (he brought this since he’s self-employed), NIF, passport/visa, Atestado de Residência, and proof of health insurance.
Even within the same location, friends told us the process could differ depending on the staff member. It’s best to come over-prepared.
Truthfully, we’ve learned that inconsistency is just a normal part of dealing with government services here.
Fingerprinting
During this appointment, our biometric data was collected whereby we were fingerprinted and consented to a background check.
We also had our picture taken (to be placed on the permit).
Payment
We paid €170 each — to SEF — for our appointments.
Friends advised us to be prepared with either cash or a credit card for payment; some locations only took one or the other.
One friend had his appointment at the same location I went to and was told he could only pay cash. When I went shortly after, I was told I could pay by card. 🤷🏽♀️
💡NOTEWORTHY: Have cash ready, but bring a credit card too — just in case. The fees AIMA lists here don’t clearly indicate the amount owed for the residency permit I believe would now apply to us (Art.º 77.º, n.º 1) so it’s best to get confirmation.
Permit Approval & Next Steps
Getting the Permit
Our appointments were in early August 2023 and I received my permit by late September… though not without effort.
Out of the blue, I got an email from SEF saying that because I wasn’t home at the time of delivery, I’d need to pick up my permit in person — and pay a €35 fee. I was home all day and oddly, there was no attempted delivery notice left behind. I had to venture back to my interview location (45 minutes away) to collect my permit.
The same thing happened to Josh (though he didn’t get his permit until October).
💡NOTEWORTHY: Your permit could arrive at any time, with or without warning. Watch your inbox and be ready to travel (and pay) to retrieve it.
Approval timelines may vary with AIMA now at the helm.
All that said, once we did receive our permits, we were legally allowed to live in Portugal for two years, with the option to renew for another three — and eventually apply for citizenship.
The permit itself looks like a driver’s license containing our picture along with our nationality, date of birth, address, permit number, and NIF, among other bits of information.
Canceling BORDR Representation
Since we used BORDR to secure our NIF, they served as our proxy (or fiscal representative).
Physically in Portugal now with our residency permits in hand, we needed to remove them from that role to avoid getting charged a representation fee the following year.
Thankfully, the process was quick and easy — we just followed the clear step-by-step instructions they provided here.
Claiming NHR Status
NHR stands for Non-habitual Resident — a tax regime designed in 2009 to attract foreigners by offering reduced tax rates for the first 10 years of residence in Portugal.
We had to claim NHR status by logging into Finanças and completing a few prompts within the platform.
NHR ended in 2023 but the newest iteration (IFICI otherwise known as NHR 2.0) places considerable emphasis on strategically attracting professionals with careers in tech and science innovation.
💡NOTEWORTHY: Moving to Portugal still has its tax benefits but in full transparency, navigating those tax strategies — in my opinion — is best left to professionals.
I strongly urge anyone looking to make the move to speak with a Portuguese immigration/tax expert who might be able to help you navigate the process and best optimize your financial situation.
In the meantime, read up on NHR 2.0 using the link above to better acclimate yourself.
Tips & Key Considerations
Exchange Rates and Politics
Has our dollar gone farther in Portugal than it did in the US?
Yes, absolutely!
But over the past six months, political instability in the US, particularly around tariffs, has contributed to a sharp drop in the value of the dollar.
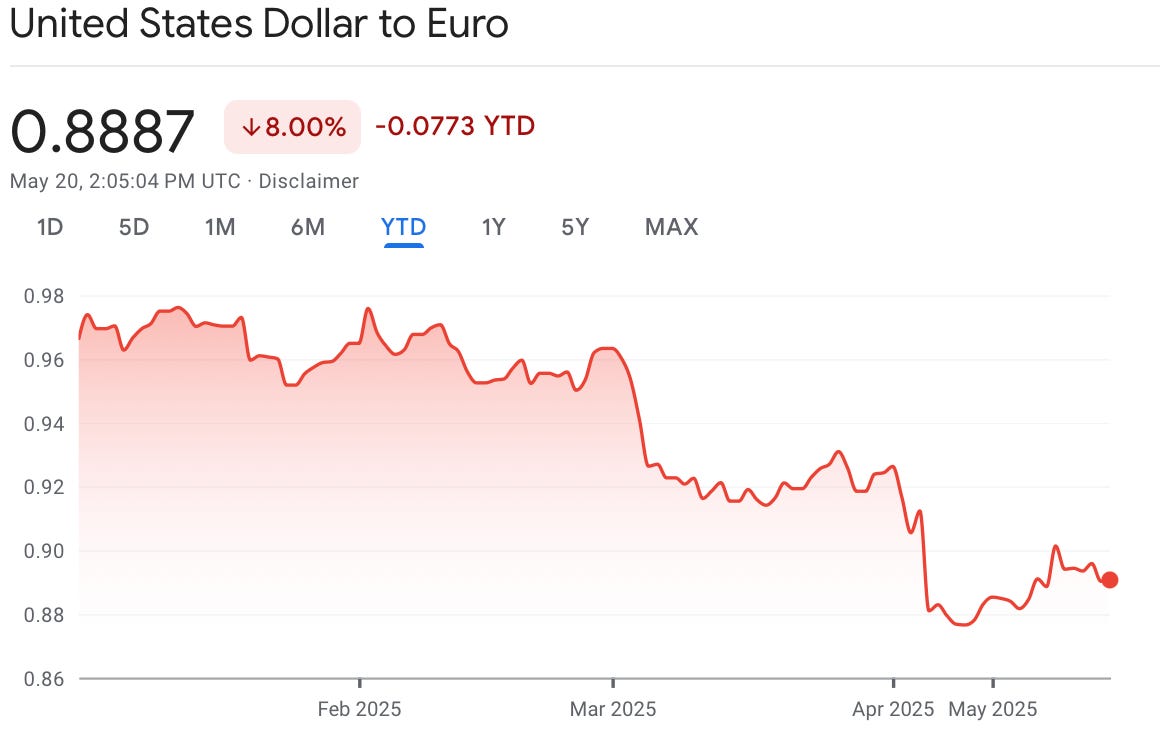
What may look like only a small difference — just a few cents — adds up quickly when transferring $ ➡️ € or paying for typical goods and services.
I know it might seem like we’re living a wildly romanticized life here — and in many ways, it is wonderful.
But I’d be remiss not to mention how deeply the tentacles of the US still reach — financially, as I mentioned above, but politically too.
Just this past Sunday, Portugal’s far-right Chega party surprisingly gained additional seats in the election. No, the country hasn’t gone full fascist (this could all be a knee-jerk reaction to broader political frustration, which the article notes), but it’s a development worth watching nonetheless.
As a Portuguese friend recently told me, political sentiment that takes root in the US often spills over globally.
Pet Registry
Moving onto lighter fare.
Since we immigrated with our dog, Jett, we had to take a few important steps upon arriving in Portugal:
Get a European Pet Passport
We made an appointment with the vet to secure this and brought with us:
USDA vet-approved paperwork
Medical history from US vet (including chip number)
Rabies certification
Our Portuguese vet then transposed that information into our dog’s European Pet Passport, which he gave us (allowing us to travel with her within the EU).
As we were there, Jett also received a few shots she was due for; in total, the visit was €50 (far cheaper than in the States).
Register with the Local Freguesia
As noted above, the Freguesia is our neighborhood municipality where we got our Atestado de Residência.
With that along with our pet passport, we made sure to get a Licença de Detenção: Posse e Circulação de Animais (a permit to possess an animal in the neighborhood); the cost was no more than €12 and needs to be updated annually.
Financial Implications
Most of the costs associated with the move happen in the visa phase.
As you can see from what I shared above, they’re relatively minimal in Phase II; here’s a breakdown:

Timelines
There are far fewer balls to juggle with the permit; the only notable timelines to keep in mind are:
Check your visa appointment date/time right away by registering for an AIMA account
Take your pet to the vet to get the European Pet Passport
Visit your local Freguesia to get your Atestado de Residência (the name of the one you reside in should be on your lease or ask your landlord); register your pet at the same time
Cancel BORDR fiscal representation once you have your permit
That, my friends, wraps up Part II.
As you can tell, this phase is much less labor-intensive — although it does require patience navigating the bureaucracy of a new country.
That said, before committing to a move of this scale, it’s important to keep a close eye on AIMA’s rules and regulations as well as do your research around tax implications (with the new NHR 2.0 in full effect, it could be worth hiring a professional to optimize your unique tax situation).
If after all of that, you’re still curious about how we’ve adjusted to life since moving here, then be sure to check out the last installment in the series here!
See you then!